Power Window Service Tips
2008-2013 GM passenger cars and light-duty trucks
The following service tips may be helpful if a front or rear side door window is inoperative, rattles or squeaks, binds, operates slowly, fits poorly or is misaligned.
Always check the appropriate Service Information for additional information on specific window operation and window regulator concerns.
Window Intermittent Operation
• For 2-pin motors, first disconnect the motor connector and then apply a 12-volt power supply to the regulator motor to verify motor functions/activates. (This is not possible on 6 or 7-pin motors.)
• Check the wire harness for pinched/shorted wires. Check the switch for correct function and check the switch bezel for sticking switches. (If the motor activates and stops, check for window/regulator binding/alignment.)
• Check for proper glass alignment/attachment. Position the window to access the side door window regulator window attachment bolts. Loosen the two bolts that attach the window to the window regulator or disengage the glass from the snap fit attachment. Slide the window up and down in the run channel. If it does not bind, properly adjust – do not replace the regulator. If it does bind, check for defective seal and/or proper seal installation, debris in the glass run channel and the glass run channel position.
Regulator/Glass Rattles
• Check for any loose fasteners and re-torque to specification as required.
• Check that the glass is in the channel and reinstall if not positioned correctly.
Noisy Operation
• Check for other components in the glass path, such as wire harness, impact foam, lock rods or cables.
• Check for proper glass alignment/attachment and door seal installation. False Glass Reversal/Glass Lowers Unexpectedly
• Check seals, re-initialize the window regulator and/or realign the glass.
• Check for debris in the glass run channel.
Slow Operation
• Check for debris in the glass run channel.
• Lubricate the window regulator, if required, with GM Synthetic Multi-Purpose Lubricant w/PTF or equivalent.
Glass Does Not Index
• Check seals, re-initialize the window regulator and/or realign the glass.
• Check the switch for correct function and check the switch bezel for sticking switches.
Front Timing Cover Modification
2003-2007 Honda Accord, Odyssey, Pilot and Ridgeline equipped with the 3.0L V-6 or 3.5L V-6 engines
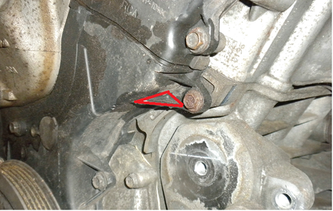
Particular V-6 engine applications may require a small modification to the front timing cover during replacement of the accessory drive belt tensioner (ACDelco part number 38332).
The OES now provides an updated tensioner assembly that may cause interference with the front timing cover of some applications. ACDelco also offers the same, updated design as the OES. To allow proper clearance, remove approximately 3mm of plastic material from the front cover. (Fig. 12)
Improper installation may result in a damaged front timing belt cover and improper accessory belt tracking, eventually leading to belt failure.
2008-2013 GM passenger cars and light-duty trucks
The following service tips may be helpful if a front or rear side door window is inoperative, rattles or squeaks, binds, operates slowly, fits poorly or is misaligned.
Always check the appropriate Service Information for additional information on specific window operation and window regulator concerns.
Window Intermittent Operation
• For 2-pin motors, first disconnect the motor connector and then apply a 12-volt power supply to the regulator motor to verify motor functions/activates. (This is not possible on 6 or 7-pin motors.)
• Check the wire harness for pinched/shorted wires. Check the switch for correct function and check the switch bezel for sticking switches. (If the motor activates and stops, check for window/regulator binding/alignment.)
• Check for proper glass alignment/attachment. Position the window to access the side door window regulator window attachment bolts. Loosen the two bolts that attach the window to the window regulator or disengage the glass from the snap fit attachment. Slide the window up and down in the run channel. If it does not bind, properly adjust – do not replace the regulator. If it does bind, check for defective seal and/or proper seal installation, debris in the glass run channel and the glass run channel position.
Regulator/Glass Rattles
• Check for any loose fasteners and re-torque to specification as required.
• Check that the glass is in the channel and reinstall if not positioned correctly.
Noisy Operation
• Check for other components in the glass path, such as wire harness, impact foam, lock rods or cables.
• Check for proper glass alignment/attachment and door seal installation. False Glass Reversal/Glass Lowers Unexpectedly
• Check seals, re-initialize the window regulator and/or realign the glass.
• Check for debris in the glass run channel.
Slow Operation
• Check for debris in the glass run channel.
• Lubricate the window regulator, if required, with GM Synthetic Multi-Purpose Lubricant w/PTF or equivalent.
Glass Does Not Index
• Check seals, re-initialize the window regulator and/or realign the glass.
• Check the switch for correct function and check the switch bezel for sticking switches.
Front Timing Cover Modification
2003-2007 Honda Accord, Odyssey, Pilot and Ridgeline equipped with the 3.0L V-6 or 3.5L V-6 engines
Particular V-6 engine applications may require a small modification to the front timing cover during replacement of the accessory drive belt tensioner (ACDelco part number 38332).
The OES now provides an updated tensioner assembly that may cause interference with the front timing cover of some applications. ACDelco also offers the same, updated design as the OES. To allow proper clearance, remove approximately 3mm of plastic material from the front cover. (Fig. 12)
Improper installation may result in a damaged front timing belt cover and improper accessory belt tracking, eventually leading to belt failure.
Replacing a Power Steering Cooler
2008-2012 Buick Enclave, 2009-2012 Chevrolet Traverse, 2007-2012 GMC Acadia or 2007-2010 Saturn Outlook
It is critical when replacing a leaking or damaged power steering cooler to replace the cooler without introducing a lot of air into the system.
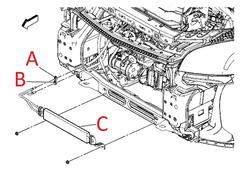
When replacing a power steering cooler (Fig. 13, C), first block off the hoses (Fig. 13, A, B) near the cooler connection with the appropriate clamps. Next, disconnect the cooler from the lines and remove the cooler.
Pre-fill the new cooler on the bench and cap off the pre-filled cooler ends for installation.
Install the new pre-filled cooler on the vehicle and remove the clamps on the hoses.
Once installation is complete, be sure to follow the Power Steering System Bleed Procedure in the appropriate Service Information
2008-2012 Buick Enclave, 2009-2012 Chevrolet Traverse, 2007-2012 GMC Acadia or 2007-2010 Saturn Outlook
It is critical when replacing a leaking or damaged power steering cooler to replace the cooler without introducing a lot of air into the system.
When replacing a power steering cooler (Fig. 13, C), first block off the hoses (Fig. 13, A, B) near the cooler connection with the appropriate clamps. Next, disconnect the cooler from the lines and remove the cooler.
Pre-fill the new cooler on the bench and cap off the pre-filled cooler ends for installation.
Install the new pre-filled cooler on the vehicle and remove the clamps on the hoses.
Once installation is complete, be sure to follow the Power Steering System Bleed Procedure in the appropriate Service Information
